The Making Of "The Brick House"

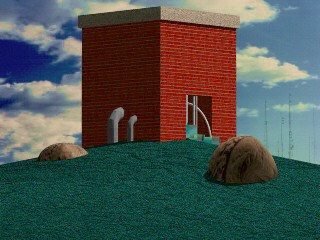
"The Brick House" was an enjoyable essay into a new series of images I am calling "A Home For Technology". The series, and the image, represent my fascination with those strange industrial utility buildings which conceal so much of purpose behind blank facades, and which, by their placement in nature, signal the closeness of man's technology and the world in which it is created.
This image was created with the 3D program Aladdin on my Amiga computer. While not a ray tracer, Aladdin allows very flexible solid modeling.
I took this opportunity to explore
- Textures of various types
- Multi-member textures
- Bump maps
- Selective shadow casting
- Wire bend
- Creation of realistic terrain
Here are some of the components of this image:
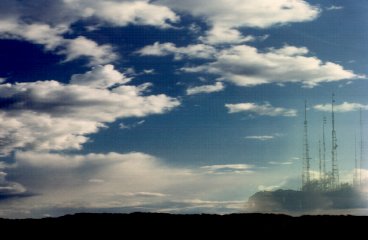
| This image was created for the background with ImageFX. The primary image shows a fair weather cumulus day which was clipped from a larger image. I added to this an image of mountaintop antennae with less than a 50% blend level. To merge the skies, I used a rub-through from this image to the cloud image, and a Feather in of 50 and of 10 with a freehand fill, just in the areas near the antennae. This made the color of the sky regain the color from the cloud image, and lose the incompatible color which was the sky in the antenna image. |
 |
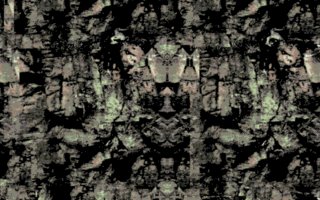
| I used a close up image of grass to create a larger image of grass texture. Tiling didn't work because it was too obviously repetitive. But the larger image started as a tiled fill of the small texture. I then cut a brush from it, shrank it, stamped it, cut again, shrank again, stamped, and finally used smear to shift the pixels to the more random appearance which was needed to prevent the appearance of regularity in the grass. |
  |
| However, the resulting grass still did not have the right texture, so I bump mapped the surface with the grass color image and also with another image, this one a mirrored and processed image of the rock of a cliff face. The combination of these two maps made the bumpy surface of the grass appropriately irregular. |
 |
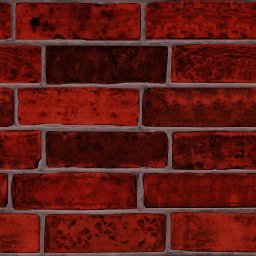
| The brick surface turned out to be much
more challenging than I expected. I started with the commercial "Snap Maps"
texture. But the texture clearly was repeating on the surface of the building.
Also, I could not use "Tile" and "Shingles" at the same time, so I needed
to make a larger bitmap that could cover an entire side of the building
at the correct scale. But when I had created such a texture, it was clear that the Snap Maps texture was not sufficiently uniform as to hide the fact that it was repeated. So I copied brick images from one part of the large bitmap to another and blotted out bricks whose character was too distinct with more milquetoast bricks until the pattern was much less visible. |
 |
| The final texture challenge was the pair of rocks protruding from the grass. For this, I used a section of one of my photos. Interestingly, the shadows on the texture combined with the natural shading of the object created an impression of bump mapping and varying gloss. |
 |
The building turned out to be something of a challenge, geometrically. Since I couldn't get LOSCut to work for me, I drew the face of the building as a polygon and extruded it, which essentially gave me an arch. To close the far end, I created a 0 thickness rectangle of the correct size and merged it with the main polygon. Then I worked with the bricks, applying them to the poly with "Shingles". The only problem with this, largely unnoticeable in this image, is that the bricks are stretched or shrunk to fill the poly sides - this is a problem in the opening, where the bricks are roughly half height as a result. But since the light there is poor, only the sharp-eyed will note the problem. Other applications may not be so forgiving, in which case you would have to create an image of the appropriate shape (half as tall as the main image) and you would have to ungroup the interior polys and apply the shorter image to them separately.
I then created a second "rectangle" for the top and color mapped a Snap Maps concrete texture to it in "shingle" mode.
The ground was made from an irregular polygon which was lathed 360 degrees, 24 segments, phong shaded, onto which the grass color and bump maps were applied as members of the texture. Don't forget to turn the color of the bump maps down to 0, and strength to 100 - I did.
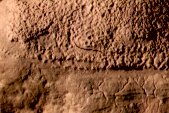
I created some machine-like boxes to spill out of the opening and used a cloud bitmap as a reflection map, after setting the color to 128,128,128. This gave an odd effect, not what I expected, but it was interesting, so I left it alone. Then I created some vertical cylinders by making an arc, extruding it and then cloning the result. Next, I needed some "bent" pipes, so I used "wire bend". But since my original cylinders had been single segment, a clone of those which I tried to use couldn't bend - it just slanted. So I had to create a new multisegment cylinder. I used wire bend on it from the center, which gave me the thin arcing pipe. Then I created a stubby multisegment cylinder and did wire bend from the ATP, which I carefully placed at one end of the pipe. This gave the pipe a nice elbow look. The documentation on this isn't entirely clear, but it seems to only use the number of segments it needs for the bend and then leaves the rest straight. That turned out to make a very nice elbow bend.
These pipes I scaled larger to attach to the side of the building, where they would help close the visual flow from the rock to the building. But they turned out to be in the shadow of the building, which made them look flat. Rather than fuss with an extra light, I set their color to 128,128,128 and turned off their receive shadow. Since the other pipes were white, this made them seem as if they were white, but in the shadow of the building. They kept a shadow of their own (which, in real life would have been created by the light from the sky).
When the image was completed, I was pleased to see that it created the odd sort of ambiance that I was after. Unfortunately, some of that is fairly subtle and can be hard to see with anything other than a 24 bit display, but I hope you can see what I meant.
Aladdin is a fascinating program with capabilities in still imaging which this work only begins to explore, not to mention advanced animation capabilities which will be the subject of future work. If you are an Amiga owner, visit the Nova Design website for more information.