Workshop: Revising The Hunt Illustration

In 2007, I prepared The Hunt for print publication. The prep included some minor rewriting, and a new illustration.
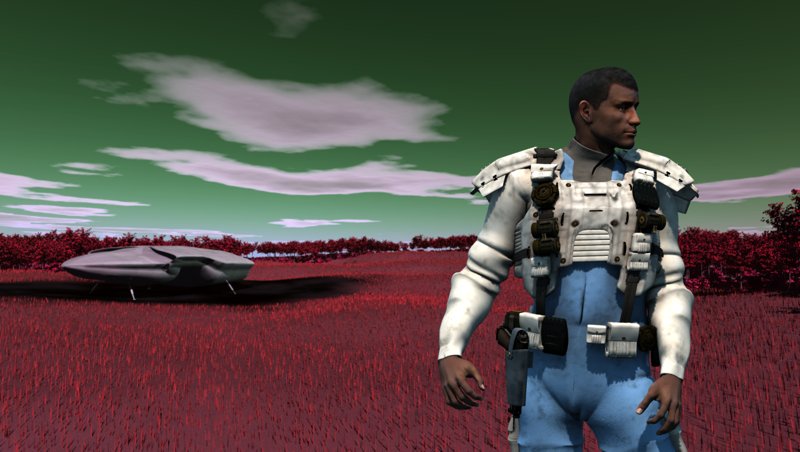
This is not an actual scene from the book, but it probably happens shortly after the second landing on Tlnou.
I used Carrara for the sky, landscape and the shuttle, and Poser (with DAZ 3D Michael 3 figure and the Mandingo skin texture, plus the Uzilite MOS Invader suit and accessories, all with custom shading). The intent was to create the look and feel of a hot summer day out in the open grassland. The trees were placed with the automated help of the Carrara surface replicator, driven by a cellular shader and the grass was placed with the help of the Anything Grows grass / hair generator. The landscape contains 16,000 trees with probably around two million leaves, and there are about two million grass blades on the ground. It took about three days to complete the design.
The original illustration had been created in the late 1980s using an Amiga, the Imagine raytracing software and a figure called Humanoid, which I altered signfiicantly to create the native.
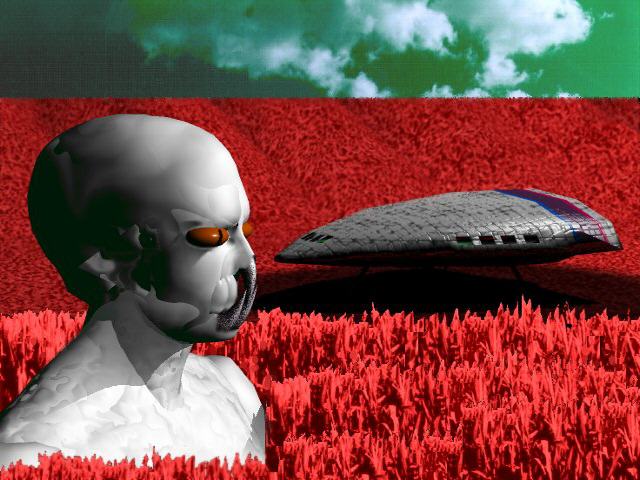
At that time, only the figure and the shuttle were modeled in Imagine. It took many many hours to render each of these relatively simple models. The grass was taken from a photo of cornstalks that I had made in Ellington, CT, and they were tinted to match the red needed for the illustration. The resulting image was used as a brush and repeated with variatioins to create both the foreground and background grasses. The sky was also a photograph that had been retinted to match the sky of Tanith.
The 21st century is a different world. Everything in the new image is modeled in 3D, though the figure and the background are composited, since two different programs were used for each. And it took minutes to render on my Sony Vaio laptop.
 |
The beginning is to create the landscape with trees. The trees and grasses of Tlnou have a reddish color due to their phosophorus-based chemistry. |
 |
Carrara's "surface replicator" is a special generator that lets you replicate a single object across the surface of another object. The key to placing the objects is to create a shader with black where the objects should appear and white where they shouldn't. The detail-oriented artist may want to paint this shader by hand, but, a procedural shader (a Veloute 2D shader in this case) can often work out fine. You may, as I did, need to shuffle the random number generator until the landscape looks right, but it gives you a chance to surprise yourself and also to still get it right with minimal effort. It also beats placing 8000 trees and 8000 bushes by hand. In this case, a second generator was used for the bushes, and in both cases, random rotations of a single tree and a single bush are enough for realism (I used 270 degrees around Z as the rotation setting). |
 |
Using the same shader for the distribution of bushes means the bushes stay within the boundaries of the same forest distribution used for the trees. An inversion of the same shader could be used to place the grasses so they don't go into the forest, but this level of detail wasn't needed. In this case, the number of grasses needed was very high, and the surface replicator could not go to a high enough number of objects. So I used the Anything Grows generator from Digital Carver's Guild to place the grasses (it allows 320,000 per generator). Anything Grows will generate grass without a separate object, unlike the surface replicator, which requires a prototype. I still needed five Anything Grows generators to create a realistic coverage. |
 |
The burn mark under the shuttle took nearly a day to accomplish. The challenge wasn't so much in creating the burn, but in aligning it with the location of the shuttle in the landscape. The burn mark is actually a mask with two purposes. One is to let through the black and grey of the ash under the shuttle. The second is to block the growth of the burned-away grass. To start with, I followed a process similar to that outlined for creating a texture map for a road elsewhere in the Workshop. I started with a screen capture of the terrain and brought it into Corel Photo Paint. |
 |
Because I captured the entire top view of the terrain, I knew that the resulting image would align with the terrain. Then I drew an oval over the shuttle, made it semi-transparent, and rotated it to align with the shuttle. |
 |
Then, a white rectangle drawn under the oval and the oval made opaque. |
 |
Finally, I painted in some irregularity around the burn mark image, feathered the irregular result, and it was ready to be used as a mask in the shader for the color and for the grass growth. |