The Making Of The Anaglyph Of "Electricity Of Life"

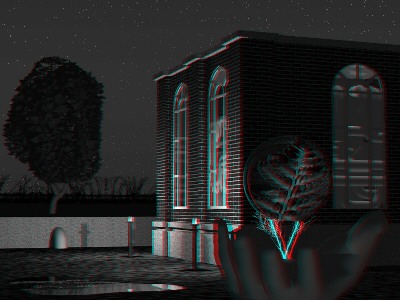
"Electricity Of Life" was the second essay into a new series of images I am calling "A Home For Technology". The series, and the image, represent my fascination with those strange industrial utility buildings which conceal so much of purpose behind blank facades, and which, by their placement in nature, signal the closeness of man's technology and the world in which it is created. The first in this series, "The Brick House", was done with Aladdin, but the need for complex interobject cutting and true glass objects made it essential to use Imagine for this project.
But What Is An Anaglyph?
"Electricity Of Life" is a conventional "3D" rendering. By that, artists mean that the image is derived from a mathematical model of 3D space, and objects reacting to light within that space according to the laws of optics. But, thanks to the nature of that 3D space, it is possible to create a true 3D image, in the sense of an image having a perceptible depth.
This special image is called an "anaglyph". It is made by combining a left and right eye view of a scene using a special method that preserves both images in one. The result is an image where the view from one eye is encoded as a red color and the image from the other eye is encoded as green and blue.
When you look at such an image through a pair of glasses with one eye filtered red and the other blue, each eye only sees the image whose light passes through the filter for that eye, which effectively reseparates the image, presenting the slightly different image to each eye that is required to directly sense depth.
If you'd like to have a look at this image, have a look at them with the 3D glasses in National Geographic's August 1998 issue, or visit Reel 3D and order a pair. Or you can even make your own. Unlike fancy LCD glasses or VR helmets, this is inexpensive, simple, platform independent form of stereo imaging.
The Imagine Side
Making the anaglyph in Imagine is fairly simple. All one needs to do is to image the same scene from two positions, approximately eye distance apart. It helps to have done a little advance planning. The main issue lies in having consistent units. For instance, I use a grid size of 12 units, and pretend each unit is an inch. This makes it easier to reposition the camera to the second eye position. Of course, one can use either or both of an unrealistic scale for the scene or position for the eyes to attain special effects, but it is easiest to keep things as close to reality as possible.
Personally, I found it easiest to have each image generated by a separate frame in the scene. First I set the scene for the left eye, having established the length of the animation as 1 frame. I rendered and then lengthened the animation to the second frame. Everything except the camera positon was lengthened to 2 frames, but I made a separate position bar for the camera in frame 2. Then I moved the camera a few units to the right and saved the new position. Then I rendered. At that point, I was done with Imagine and it was time to turn the show over to ImageFX.
One of the nice things about the separate frame approach is the ability to make an animation in the stage editor and assess the distance between the "eyes" for correctness.
The Image Processing Side
The remainder of anaglyph production is image processing. I tried to work this out for myself, but, fortunately, I was able to find a brief description on the web which assisted my efforts. For the example that follows I used ImageFX, but similar actions could be performed with PhotoShop or any other image processing tool:
- Rename the frames LeftEye and RightEye for ease of reference.
- Load each image and convert to grey scale. WARNING: Some areas (like the background in "Electricity Of Life") which are large areas of close color shades, will take on a noticeable banding at this time. There's really nothing you can do about it.
- Save LeftEyeRed, RightEyeGreen, RightEyeBlue from LeftEye and RightEye.
- Close everything and load LeftEyeRed, RightEyeGreen, RightEyeBlue.
- Double click on the filled rectangle tool and set the mode to Colorize.
- From the palette, create or pick a color which is 255,0,0 (RGB) and fill the entire LeftEyeRed image.
- Create or pick 0,255,0 and fill the entire RightEyeGreen image.
- Create or pick (you guessed it!) 0,0,255 and fill the entire RightEyeBlue image.
- Create a new empty buffer the same size as the image. Make it the main buffer. RightEyeBlue is the current swap buffer.
- Use "Composite" to merge the swap to the main buffer. Set the merge percent to 100%. Do the merge.
- Click on RightEyeBlue and then back on the new buffer. RightEyeBlue is now the swap buffer. Use "Composite" with the same merge percent, and merge with the "Absolute Add" mode. This ensures that the brightness information is preserved as best as possible.
- Repeat 11 for LeftEyeRed.
- Now you have an anaglyph.